Features
- WooCommerce UPS Shipping API Connection Configuration
- Boxes Configuration
- Product Configuration
- Origin Configuration
- WooCommerce UPS Shipping Services Configuration
- Rename Service and Add Markup
- WooCommerce UPS Shipping Rates
- Suppress Shipping Rates and Offer Free Shipping
- When Order’s Parcel Shipment Exceeds a Certain Threshold
- WooCommerce UPS Shipping Label $9 / Monthly
- Generate Label
- Print Label
- Logs Details
Effortlessly access your negotiated UPS Shipping rates, create shipments, and print labels—all seamlessly integrated with WooCommerce. Experience dynamic shipping solutions displayed on your shopping cart and order pages. Additionally, efficiently manage currency exchange, ensuring that shipping costs are adjusted according to the selected currency on your store.
Plugin Download Free
- Obtain the plugin’s zip file by clicking on the provided download link.
- Alternatively, you can search for the plugin directly on the WordPress.org plugin directory.
Install Plugin
Go to: Plugins > Add New Plugin
1. Upload Plugin

- Log in to your WordPress admin dashboard.
- From the dashboard, go to the “Plugins” menu on the left-hand side and select “Add New.”
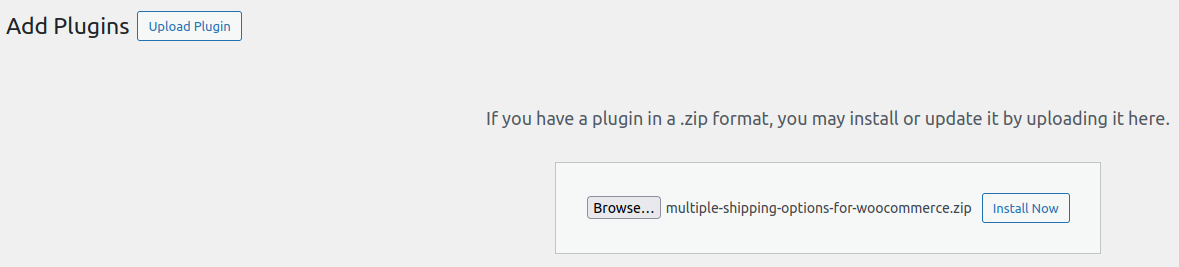
- On the “Add Plugins” page, click the “Upload Plugin” button located at the top.
- Choose the plugin zip file you downloaded in the previous step and click “Install Now.”
- Once the installation is complete, a success message will appear.
2. Search Plugin

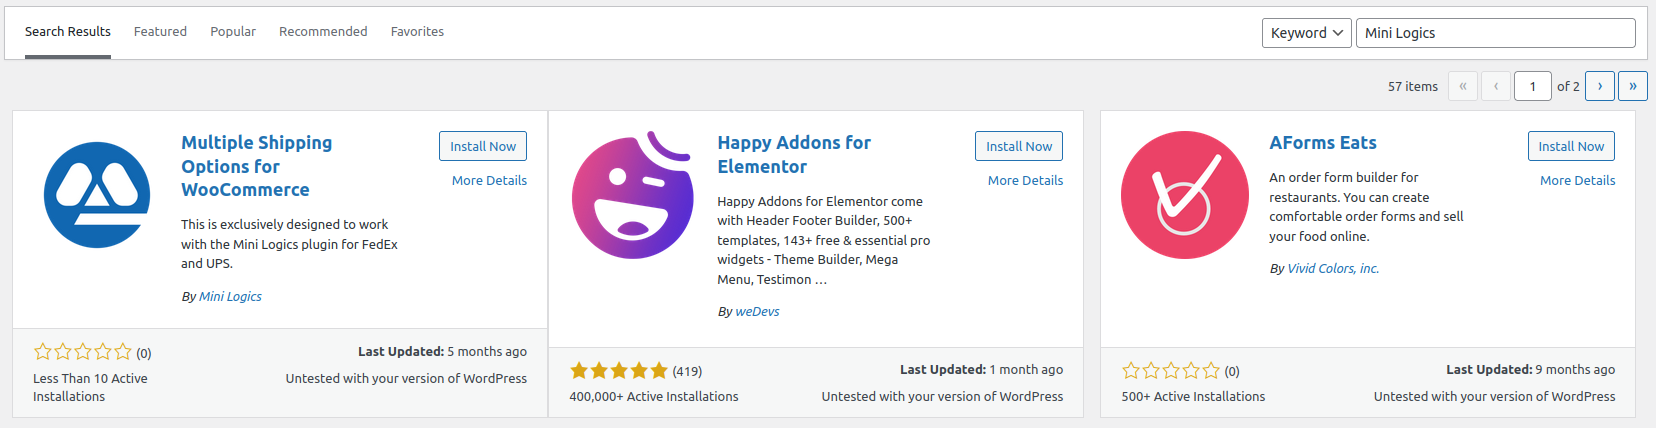
In the ‘Search plugins’ field, search for either ‘Mini Logics’ or ‘Multiple Shipping Options for WooCommerce,’ and the plugin will be listed below. Simply click on the ‘Install Now’ button.
Activate Plugin
1. Automatic
-

- After installation, you’ll be redirected to a confirmation page. Click the “Activate Plugin” button to activate the newly installed plugin.
2. Manual
-

- Alternatively, you can find the plugin you just installed in the “Plugins” menu and click the “Activate” link below it.
Activate Plugin in Your Shipping Zones

By default, the plugin is automatically added to your store’s address-defined shipping zones. If you wish to customize this setup, follow these steps:
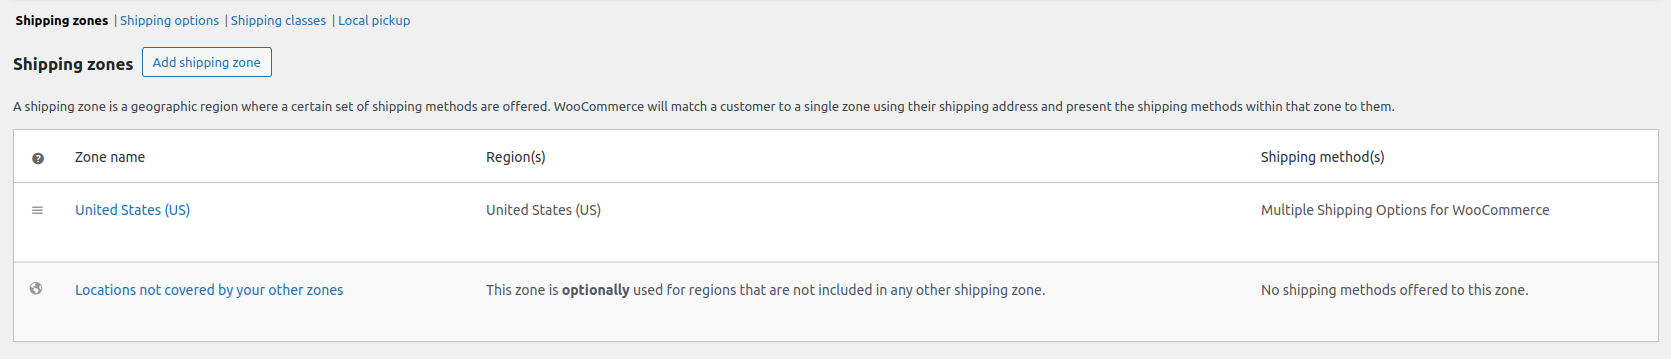
Go to: WooCommerce > Settings > Shipping > Shipping Zones
1. Add a New Shipping Zone
Click on “Add shipping zone” at the top. Provide a descriptive Zone Name, select applicable Zone Regions, and choose your preferred Shipping methods from the dropdown menu associated with the “Multiple Shipping Options for WooCommerce” plugin.
2. Activate the Plugin in an Existing Shipping Zone
If you already have shipping zones set up, locate and click on the existing zone name. Then, add the desired Shipping methods by selecting them from the dropdown menu provided by the “Multiple Shipping Options for WooCommerce” plugin.
This ensures that the plugin is actively integrated into your chosen shipping zones, allowing you to offer multiple shipping options tailored to your customers’ preferences. Access Plugin
- To access the plugin’s configuration settings, navigate to the WooCommerce menu and select “Settings.” Then, click on the “Multiple Shipping Options for WooCommerce” tab.
- Alternatively, you can go to the “Plugins” menu, locate the “Multiple Shipping Options for WooCommerce” plugin, and click the “Settings” link below it.
Settings Page
Manage your shipping settings effortlessly with our plugin’s dedicated settings page. Sync your authorization key, configure shipping methods, and specify label requirements. Seamlessly control your WooCommerce UPS shipping preferences, set up API connections, and oversee service management—all in one convenient location.
1. Authentication

Access the ‘Authorization Key’ field within the plugin settings page to effortlessly sync your plugin with Mini Logics. This key enables access to both trial and paid plans, enabling the functionality of WooCommerce UPS shipping API within your settings.
2. Shipping Methods

2.1 Shipping in Test Mode
Activate the ‘Shipping in Test Mode’ checkbox to enable the testing environment for WooCommerce UPS shipping carrier. This allows you to obtain rates and create labels in a controlled testing environment.
2.2 Single shipping rate option
This option shows the most cost-effective shipping method available among all activated carriers. It selects the single cheapest shipping rate.
2.3 Multiple cheapest options
This feature displays the cheapest shipping rates from each activated carrier. It provides multiple affordable options, each from a different carrier.
2.4 Minimum shipment weight requirement for LTL Freight Shipping; Small Package Shipping will be returned otherwise
Specify the minimum shipment weight requirement for LTL Freight Shipping. If the weight falls below this threshold, rates from small package carriers will be displayed. If the weight exceeds this value, the system will trigger rates from Freight carriers.
2.5 Suppress shipping rates and offer free shipping when an order’s parcel shipment exceeds a certain threshold
If the order’s parcel shipment exceeds a certain weight limit or cart total limit, the plugin will suppress shipping rates and provide free shipping.
2.6 What to do when a product does not provide a shipping rate on the cart/checkout page
In case a product doesn’t provide a shipping rate due to API issues, missing details, or an incorrect address, we’ll help you continue shopping on the site. Choose the best option for your store.
2.7 If the products in an order are from multiple origins and one of them does not have a return rate, the total shipping cost should not be displayed on the cart page.
If an order contains products from multiple origins and one of them doesn’t provide shipping rates, enabling this option will prevent the display of total shipping costs on the cart page, even for products with available rates.
2.8 Options to consider when no shipping rates are available
In case of no available shipping rates, choose to either display a custom error message or set a fixed shipping rate for a smooth shopping experience.
2.8.1 Display an error message
You can input a custom message, and it will be shown on the shopping cart page to inform customers about the issue.
2.8.2 Setting a custom shipping rate
By choosing this option, you can display a static shipping service on the shopping cart page, providing a seamless shopping experience even when dynamic rates are not available.
3. Label Specifications

Configure label specifications for seamless shipping. Provide essential details such as Company Name, Contact Name, Phone Number, and Tax Identification Number, which will be used during the label generation process.
4. Origin

The default origin address for all store products is based on the address fields in the origin section. If you need to customize the origin address for specific products, you can do so on the product page, where you’ll find the option to make individual selections.
5. WooCommerce UPS Shipping
5.1 Enable / Disable
To activate WooCommerce UPS Shipping on the shopping cart page, simply enable the checkbox labeled “Enable / Disable.
5.2 API Connection

Activate your WooCommerce UPS Shipping seamlessly by securely entering your UPS API credentials—Account Number, Username, Password, and Access Key. Completing this setup ensures a successful connection, enabling continuous shipping functionality on your cart page.
5.3 UPS Services

The shipping plugin has Domestic and International Services, each with options you can customize. For each UPS option, use the “UPS Service Label” to change the service name, making it clear for your customers. There’s also the “UPS Service Markup” feature, letting you adjust UPS service costs. Add or subtract a fixed amount or percentage to control the pricing strategy for each service.
5.4 Domestic Services

- UPS Ground
- UPS 2nd Day Air
- UPS 2nd Day Air A.M
- UPS Next Day Air Saver
- UPS Next Day Air
- UPS Next Day Air Early
- UPS 3 Day Select
5.5 International Services

- UPS Standard
- UPS Expedited
- UPS Express Saver
- UPS Express
- UPS Express Plus
5.6 Accessorials

Residential delivery
When checked, the provided price quotes will include the cost of delivering to a home. Therefore, the total cost you see incorporates the additional fee for delivering packages to residential addresses.
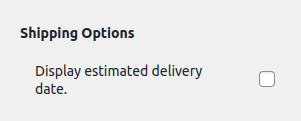
5.7 Shipping Options

Display estimated delivery date
When checked, you’ll see the expected delivery date and time. This info appears right after the service name and before showing the cost estimate.
Boxes

The WooCommerce UPS Shipping Packaging feature helps sellers set and save standard box sizes. This makes packing better for getting the right shipping costs. Sellers choose these sizes to fit their needs. The plugin suggests a good packing way for each order and shows details on the order page. Picking the right packing based on saved box sizes gives exact and trustworthy shipping cost estimates. This makes shipping work better and cost less. You can turn this feature on or off using the ‘Enable / Disable’ checkbox at the beginning. Below are the box parameters available for configuration:
- Open: Check this box to make the box available for packaging solution calculations.
- Box Name: Enter a unique nickname or specific name for the box to easily identify it.
- Inner Length (in): Specify the inner length of the box in inches.
- Inner Width (in): Provide the inner width of the box in inches.
- Inner Height (in): Determine the inner height of the box in inches.
- Outer Length (in): Specify the length of the box in inches, including any outer dimensions.
- Outer Width (in): Indicate the width of the box in inches, including any outer dimensions.
- Outer Height (in): Specify the height of the box in inches, including any outer dimensions.
- Box Weight (lbs): Enter the weight of the box in pounds.
- Max Weight (lbs): Specify the maximum weight that the box is allowed to weigh, including the weight of the box itself. Enter this value in pounds.
Product

Enhance your WooCommerce product detail page with advanced shipping options. Input precise details such as product dimensions and weight to ensure accurate shipping rates and facilitate seamless shipment creation. The Origins dropdown allows you to assign a specific sender address to each product. In case you opt not to select an origin at the product level, the plugin will automatically use the globally set origin from the settings page. This flexibility ensures precise and customizable shipping solutions tailored to your product variations.
1. Edit Origins
Empower your shipping management with the “Edit Origins” feature. Located conveniently next to the dropdown menu, this link allows you to effortlessly add, update, and delete origins. Within this intuitive interface, provide specific details such as origin address, city, state, zip, and country. Customize your shipping origins with ease, ensuring accuracy and flexibility in your shipping processes.
WooCommerce Order

On the WooCommerce order page, there’s a cool feature that lets you easily do a bunch of things. You can make a shipment, print a label, and even change up your order before shipping it out. After you’ve placed an order, you can use the WooCommerce UPS Shipping Label tool right there on the page to send your stuff. The best part is, it’s super easy – you can get your shipments ready in just two clicks! It’s like a quick and simple way to handle all your shipping needs without any hassle.
1. Billing and Shipping Address
There are choices for setting the delivery address for your shipment. You can pick either the ‘Billing Address’ or ‘Shipping Address’ using the radio buttons. Normally, the system fills in the shipping address based on the info you gave during checkout. If you need to change it or want a different address, don’t worry. There’s a handy feature at the top of the WooCommerce order page. It uses the default WooCommerce addresses, and you can easily pick your preferred destination by clicking on the right option. This smooth process lets you quickly adjust where your shipment goes, just the way you want.
2. Enable / Disable
When this checked, it activates the shipment creation process, allowing you to move forward with it. Conversely, when the checkbox remains unselected or unchecked, no further processing occurs; everything remains unchanged without any action taken.
3. From
I have incorporated a dropdown menu containing a list of origin addresses. By default, the selected origin address is the one associated with the product during the checkout process. This address serves as the point of origin for the shipment. Additionally, you have the option to include a new origin address by accessing the ‘Edit Origins’ link. Once you’ve added a new origin, it becomes conveniently available for selection in the dropdown menu, offering flexibility in choosing the origin address for your shipments.
4. To
This section displays the destination address for your shipment. This destination address is derived from your selection between the ‘Billing Address’ or ‘Shipping Address.’ Whichever address you’ve chosen, whether it’s the billing or shipping address, will be reflected as the destination address shown in this section. Furthermore, should you need to make changes, you have the flexibility to modify this destination address. This can be done to synchronize it with either the billing or shipping addresses displayed at the top of the same order page. Simply edit the address in this section and update the order accordingly to ensure accuracy and alignment with your preferences.
5. items
This provides a comprehensive list of products added during the checkout process. Each item is accompanied by a quantity text field, allowing for easy adjustment of product quantities. The user-friendly interface ensures effortless modifications. To update the quantity of a specific item, simply adjust the corresponding quantity field to reflect the desired amount. Removing a product from the order is just as simple. By clicking on the appropriate remove button or icon associated with the item, you can promptly delete it from the order. To add new items to the order, leverage the default WooCommerce functionality. Change the order status to ‘Pending Payment’ to activate the ‘Add items’ button in the default WooCommerce ‘Item’ section. Clicking on this button enables you to include additional products in the order. After making necessary updates, click the ‘Update’ button to save changes. Upon page refresh, you’ll notice the ‘Multiple Shipping Options for WooCommerce’ section reflects the new shipment, incorporating the newly added products. Within this section, you have the flexibility to effortlessly rearrange products between different shipments using a simple drag-and-drop mechanism. This intuitive feature allows for the allocation of products to different shipments based on specific shipping requirements. Furthermore, through the ‘Items’ section, you can conveniently drag and drop items between multiple shipments. To include additional products in the same order from different origins, utilize the default WooCommerce method. Change the order status to ‘Pending Payment,’ update the order page, and then use the ‘Add Item(s)’ button for seamless integration.
6. Accessorials
This section includes two significant options: ‘Residential’ and ‘Liftgate.’ ‘Residential’ is tailored for small package shipping carriers and is currently compatible with UPS and FedEx services. When selected, this option triggers additional charges associated with delivering to residential addresses. On the other hand, ‘Liftgate’ is designed for LTL Freight Shipping carriers. Choosing this option incurs additional costs related to the utilization of a liftgate during the delivery process for heavy or large shipments. Once checked, these options automatically add corresponding charges to the total shipment cost. This ensures transparency in pricing and allows customers to factor in additional fees associated with specific delivery requirements.
7. Add new shipment
This is a valuable feature designed to streamline the process when a single order comprises multiple products with distinct origins. This feature becomes especially handy when you need to ship one or more products from different locations. By utilizing the ‘+ Add New Shipment’ option, you can efficiently organize and manage shipments for diverse products within the same order. This is achieved by dragging the specific product(s) into the newly created shipment and setting their respective origin addresses. Notably, this functionality caters to scenarios where you are dealing with new products originating from different locations. The flexibility of the ‘Add New Shipment’ section becomes apparent on the order page, particularly when managing multiple shipments. It provides a user-friendly and adaptable solution for handling diverse products within a single order, ensuring an efficient and customized shipping process tailored to your specific requirements.

Before making the shipment, an important step is to check the latest shipping prices. You can do this by using the ‘Calculate Shipping’ button. It makes the system figure out new shipping prices based on your order. These prices will then show up in the ‘Rates’ tab, giving you a good look at all the available shipping choices. After you’ve looked at the prices and picked the service you like, you can go ahead and choose that service. Then, by clicking the ‘Ship Now’ button, the system will create the shipping label for your chosen service. This way, you can easily see and pick the right shipping option before creating the label for your shipment.
1. Packaging

This provides detailed information about how the order items are packed. This tab displays information about the packaging, including whether the items are already packed. If they are, it reveals details such as the Box name, Dimensions, Quantity, and the weight of the final box. Even if the items are not packed in boxes but have their own packaging, this tab ensures visibility of this information. It serves as a comprehensive overview, allowing you to track the specifics of each package, whether it’s in a designated box or has its own packaging arrangement. This feature adds transparency and convenience to the order fulfillment process by presenting a clear snapshot of the packing details for your items.
2. API Response

The ‘API Response’ tab captures the responses generated by the system during the checkout process. These responses directly influence the rates displayed at the time of placing an order. Additionally, this tab is linked to the creation of shipments, providing a record of the responses utilized for generating shipments. It’s a centralized place to track the data influencing rate calculations during order placement and shipment creation.
3. Label Confirmation

The ‘Ship Now’ button is a key tool for generating shipping labels. First, you start by using the ‘Calculate Shipping’ button. This prompts the system to calculate updated shipping prices based on your order details. Once calculated, these prices are displayed in the ‘Rates’ tab, allowing you to review and choose from the available shipping options. After selecting your preferred service from the displayed options, you can proceed by clicking the ‘Ship Now’ button. This action triggers the system to generate the shipping label specifically aligned with the service you’ve chosen. It’s a streamlined process that ensures you pick the right shipping option before creating the label for your shipment.
4. Label

Later, in the ‘Label’ tab, you’ll find a list of generated labels. You can individually open each label and print it. Moreover, there’s an option to print all labels at once, particularly useful for PNG format labels. This feature allows for the simultaneous printing of all labels associated with the same shipment, optimizing the printing process.
Logs

Explore the easy way to keep track of your customers’ shipping experience with our Logs feature. The Logs page breaks down important shipping activities, showing calculated shipping rates on cart and checkout pages. Check the WooCommerce Items log to see what products were added to the cart. The Boxes log gives insights into packaging details, sender and receiver addresses, ensuring safe deliveries. Dive into API Response records for a complete overview of system operations during key interactions. Logs offer valuable insights into shipping, customer choices, and system actions, helping you make informed decisions for a better customer experience.

 In the ‘Search plugins’ field, search for either ‘Mini Logics’ or ‘Multiple Shipping Options for WooCommerce,’ and the plugin will be listed below. Simply click on the ‘Install Now’ button.
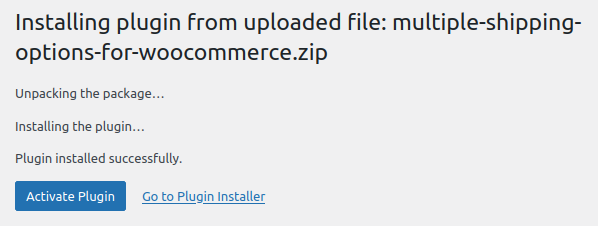

 By default, the plugin is automatically added to your store’s address-defined shipping zones. If you wish to customize this setup, follow these steps:
  Access the ‘Authorization Key’ field within the plugin settings page to effortlessly sync your plugin with Mini Logics. This key enables access to both trial and paid plans, enabling the functionality of WooCommerce UPS shipping API within your settings.
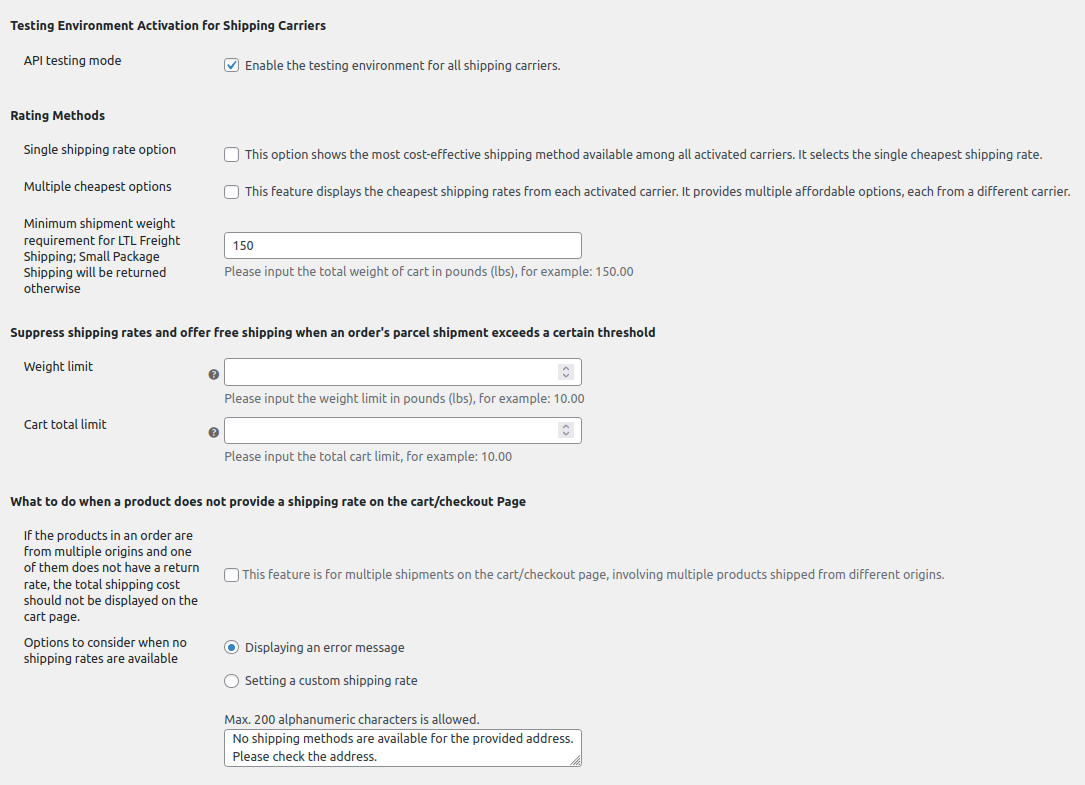
 Configure label specifications for seamless shipping. Provide essential details such as Company Name, Contact Name, Phone Number, and Tax Identification Number, which will be used during the label generation process.
 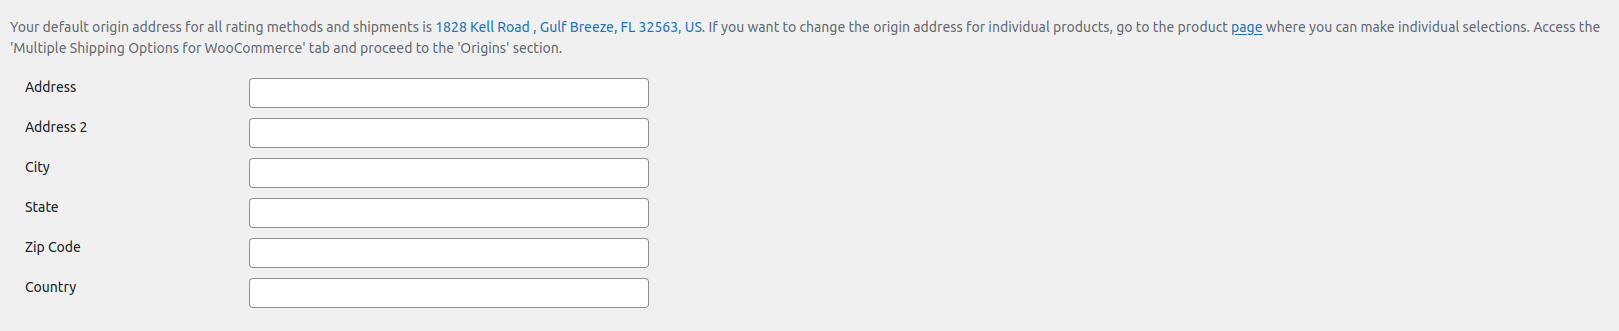 The default origin address for all store products is based on the address fields in the origin section. If you need to customize the origin address for specific products, you can do so on the product page, where you’ll find the option to make individual selections.
 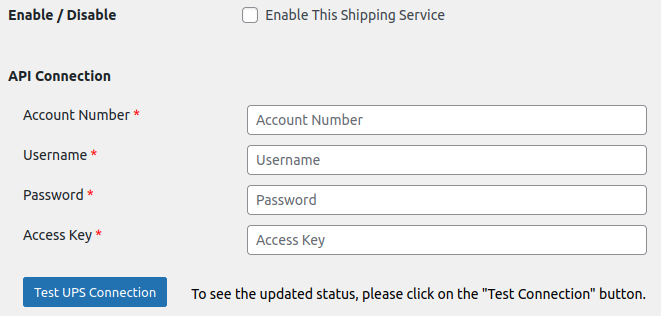 Activate your WooCommerce UPS Shipping seamlessly by securely entering your UPS API credentials—Account Number, Username, Password, and Access Key. Completing this setup ensures a successful connection, enabling continuous shipping functionality on your cart page.
 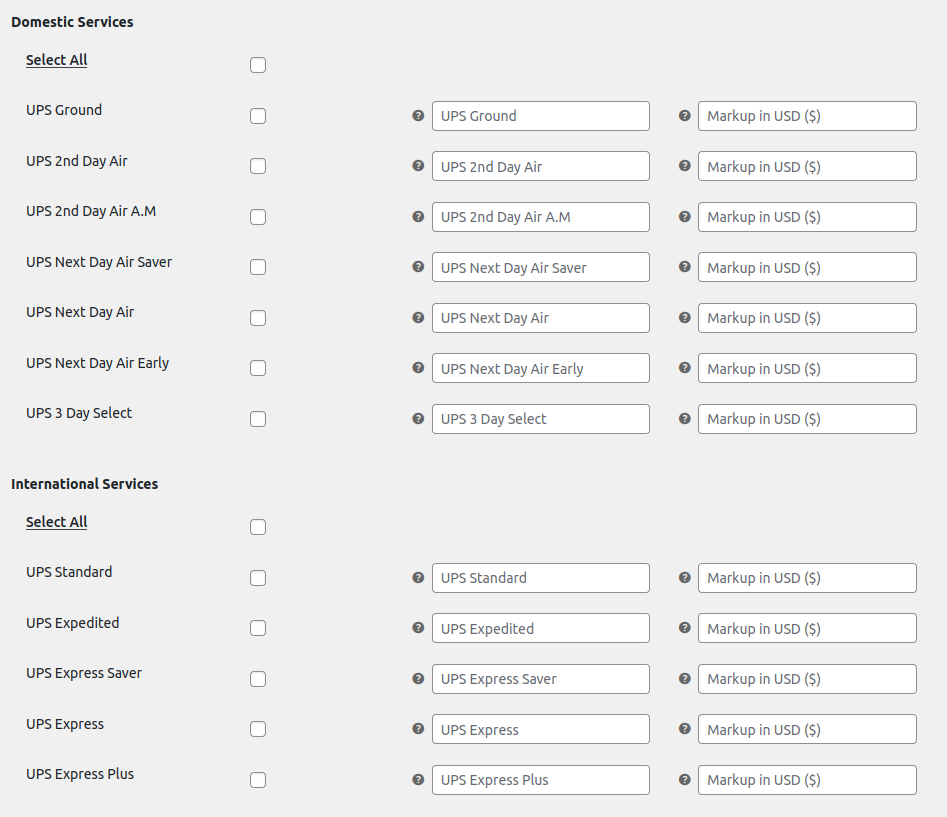 The shipping plugin has Domestic and International Services, each with options you can customize. For each UPS option, use the “UPS Service Label” to change the service name, making it clear for your customers. There’s also the “UPS Service Markup” feature, letting you adjust UPS service costs. Add or subtract a fixed amount or percentage to control the pricing strategy for each service.
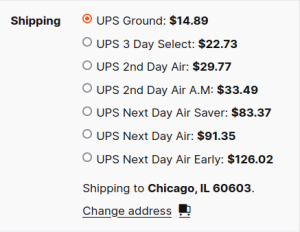


 The WooCommerce UPS Shipping Packaging feature helps sellers set and save standard box sizes. This makes packing better for getting the right shipping costs. Sellers choose these sizes to fit their needs. The plugin suggests a good packing way for each order and shows details on the order page. Picking the right packing based on saved box sizes gives exact and trustworthy shipping cost estimates. This makes shipping work better and cost less. You can turn this feature on or off using the ‘Enable / Disable’ checkbox at the beginning. Below are the box parameters available for configuration:
 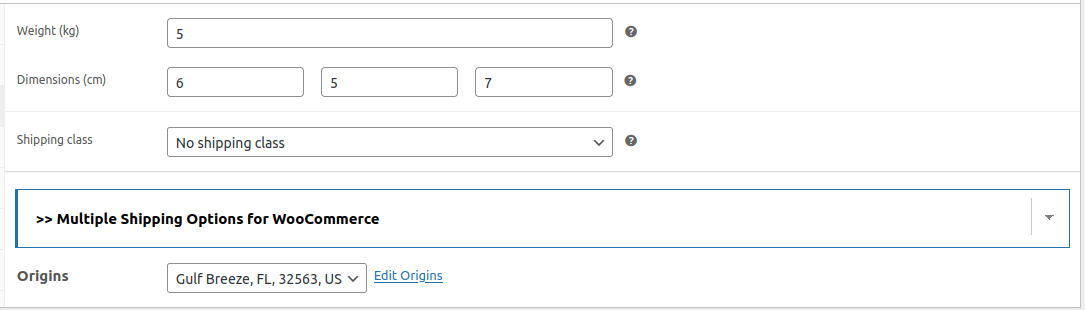 Enhance your WooCommerce product detail page with advanced shipping options. Input precise details such as product dimensions and weight to ensure accurate shipping rates and facilitate seamless shipment creation. The Origins dropdown allows you to assign a specific sender address to each product. In case you opt not to select an origin at the product level, the plugin will automatically use the globally set origin from the settings page. This flexibility ensures precise and customizable shipping solutions tailored to your product variations.
 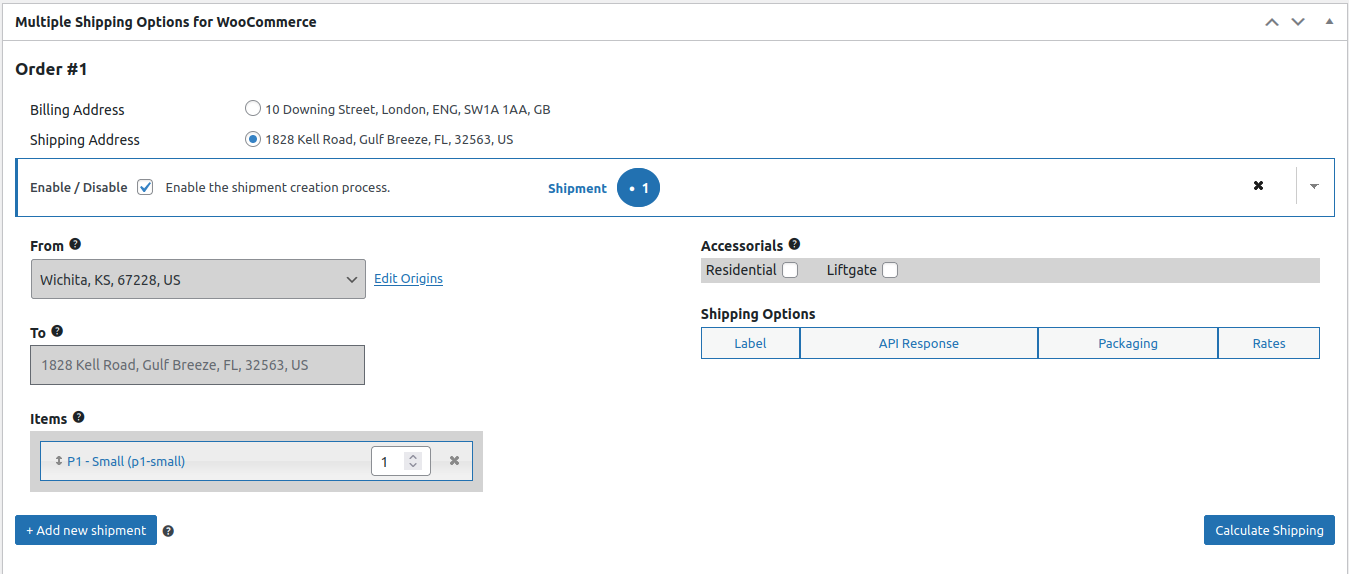 On the WooCommerce order page, there’s a cool feature that lets you easily do a bunch of things. You can make a shipment, print a label, and even change up your order before shipping it out. After you’ve placed an order, you can use the WooCommerce UPS Shipping Label tool right there on the page to send your stuff. The best part is, it’s super easy – you can get your shipments ready in just two clicks! It’s like a quick and simple way to handle all your shipping needs without any hassle.
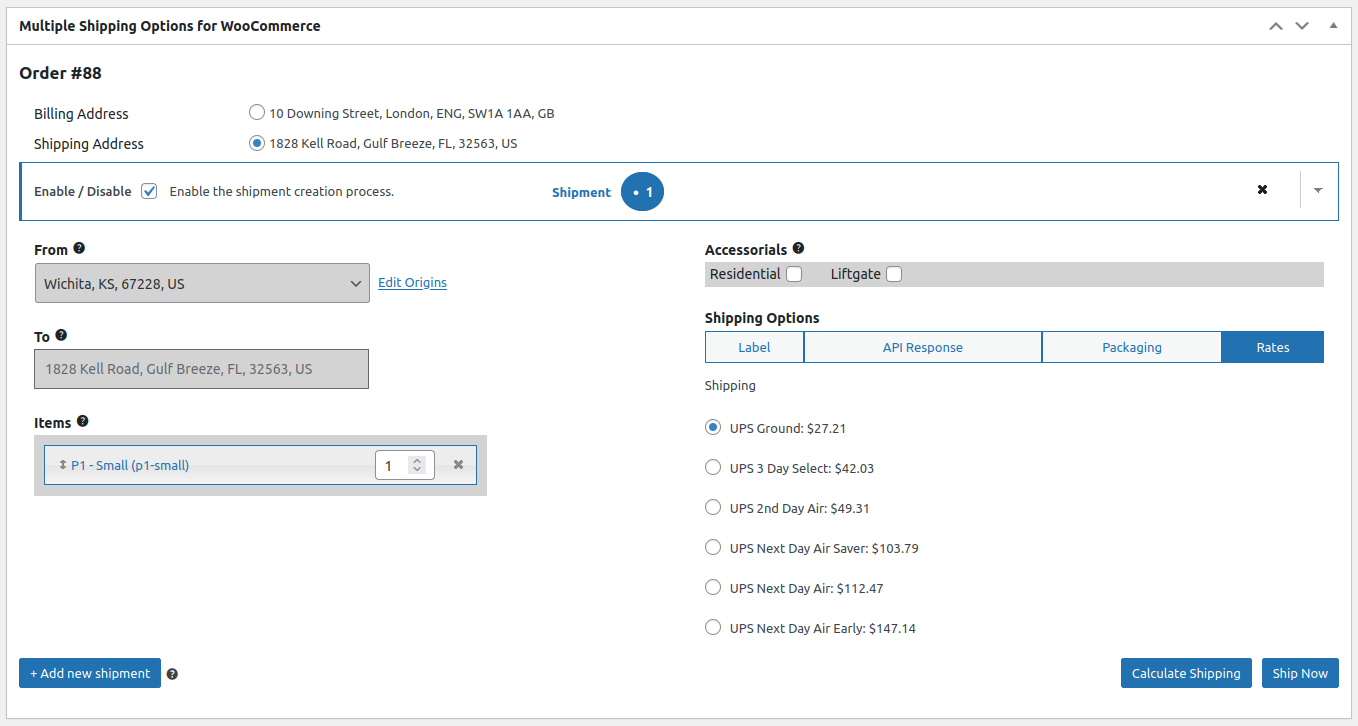 Before making the shipment, an important step is to check the latest shipping prices. You can do this by using the ‘Calculate Shipping’ button. It makes the system figure out new shipping prices based on your order. These prices will then show up in the ‘Rates’ tab, giving you a good look at all the available shipping choices. After you’ve looked at the prices and picked the service you like, you can go ahead and choose that service. Then, by clicking the ‘Ship Now’ button, the system will create the shipping label for your chosen service. This way, you can easily see and pick the right shipping option before creating the label for your shipment.
  This provides detailed information about how the order items are packed. This tab displays information about the packaging, including whether the items are already packed. If they are, it reveals details such as the Box name, Dimensions, Quantity, and the weight of the final box. Even if the items are not packed in boxes but have their own packaging, this tab ensures visibility of this information. It serves as a comprehensive overview, allowing you to track the specifics of each package, whether it’s in a designated box or has its own packaging arrangement. This feature adds transparency and convenience to the order fulfillment process by presenting a clear snapshot of the packing details for your items.
 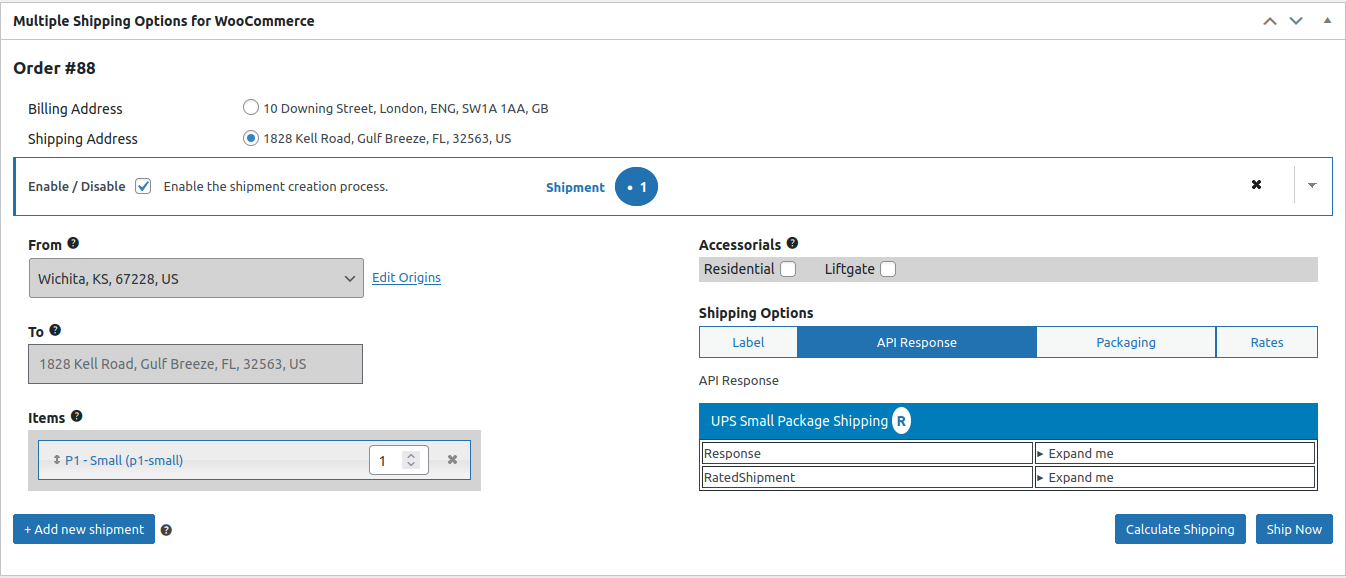 The ‘API Response’ tab captures the responses generated by the system during the checkout process. These responses directly influence the rates displayed at the time of placing an order. Additionally, this tab is linked to the creation of shipments, providing a record of the responses utilized for generating shipments. It’s a centralized place to track the data influencing rate calculations during order placement and shipment creation.
 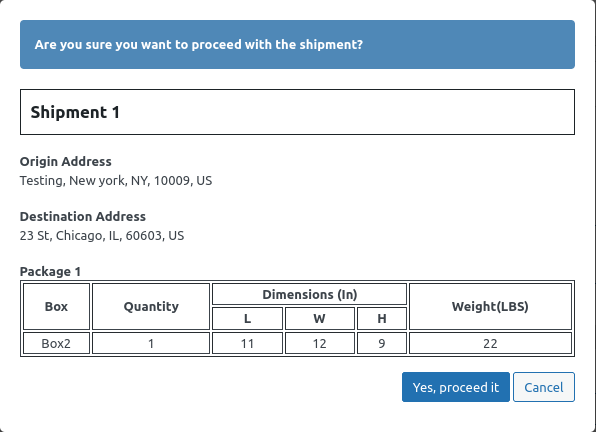 The ‘Ship Now’ button is a key tool for generating shipping labels. First, you start by using the ‘Calculate Shipping’ button. This prompts the system to calculate updated shipping prices based on your order details. Once calculated, these prices are displayed in the ‘Rates’ tab, allowing you to review and choose from the available shipping options. After selecting your preferred service from the displayed options, you can proceed by clicking the ‘Ship Now’ button. This action triggers the system to generate the shipping label specifically aligned with the service you’ve chosen. It’s a streamlined process that ensures you pick the right shipping option before creating the label for your shipment.
 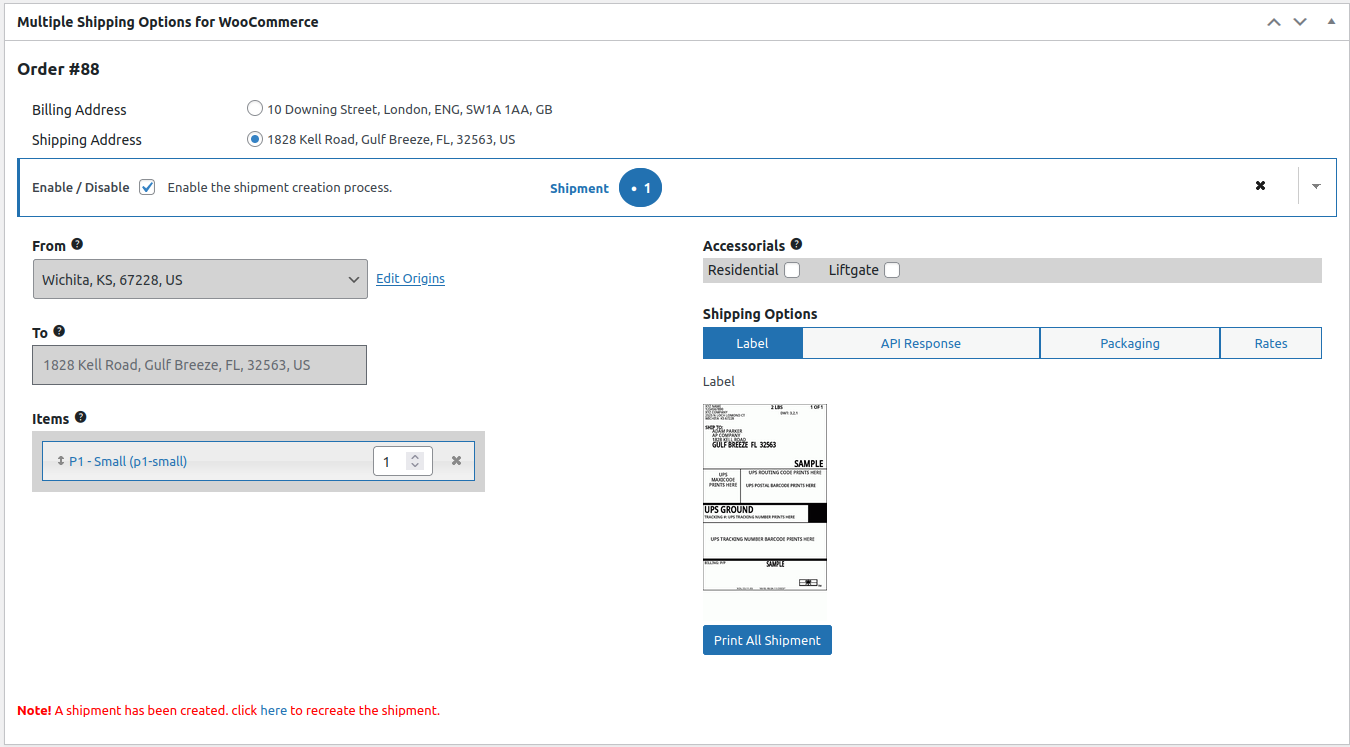 Later, in the ‘Label’ tab, you’ll find a list of generated labels. You can individually open each label and print it. Moreover, there’s an option to print all labels at once, particularly useful for PNG format labels. This feature allows for the simultaneous printing of all labels associated with the same shipment, optimizing the printing process.
 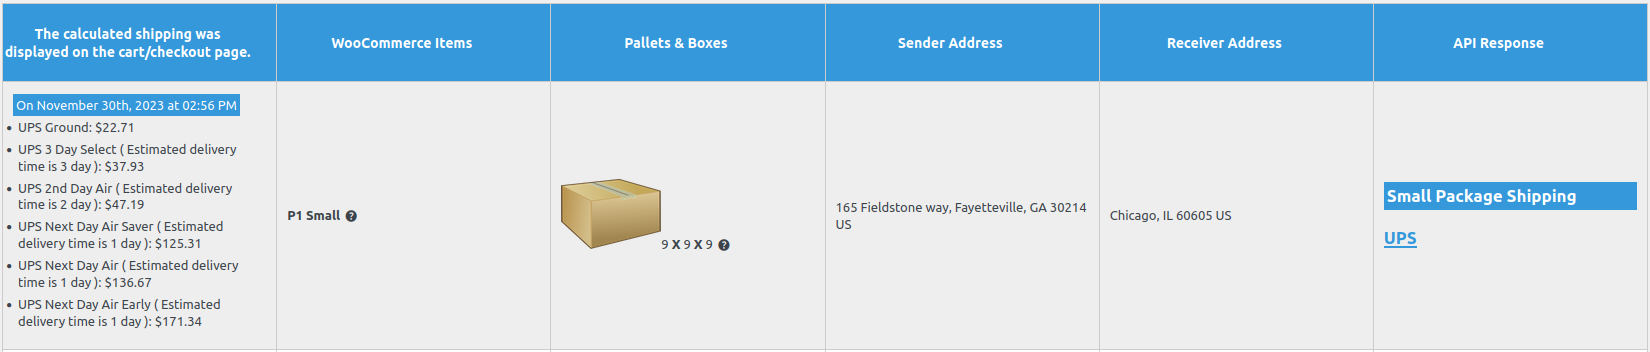 Explore the easy way to keep track of your customers’ shipping experience with our Logs feature. The Logs page breaks down important shipping activities, showing calculated shipping rates on cart and checkout pages. Check the WooCommerce Items log to see what products were added to the cart. The Boxes log gives insights into packaging details, sender and receiver addresses, ensuring safe deliveries. Dive into API Response records for a complete overview of system operations during key interactions. Logs offer valuable insights into shipping, customer choices, and system actions, helping you make informed decisions for a better customer experience.